
A beginner-friendly walkthrough for meeting SEBI’s static IP requirement for algorithmic trading — without tying your algo to your home broadband.
Introduction
Starting April 1, SEBI (Securities and Exchange Board of India) introduced new regulations for algorithmic trading. The headline change: every order placed through an API must originate from a static IP address.
If you’re running an algo strategy — or planning to — this guide walks you through exactly what a static IP is, why SEBI now requires one, the two ways to get one, and a complete, step-by-step tutorial for setting up a free, portable, cloud-based static IP that works no matter where you are in the world.
By the end of this guide, you’ll have:
- A cloud server (droplet) with a reserved static IP
- All the algo-trading dependencies installed on that server
- Your static IP registered with your broker’s API (Dhan, in this walkthrough)
- A working test order fired from the cloud, proving your setup is compliant
Let’s get started.
What Is a Static IP, and Why Does SEBI Require One?
Every device connected to the internet has an IP address — think of it as the device’s postal address. Normally, this address is dynamic: your internet service provider (ISP) reassigns it periodically, so the IP you have today might be different tomorrow.
You can check your own current IP address any time using a site like whatismyipaddress.com. Below is an example of what that lookup shows — your public IPv4/IPv6 address, along with your ISP, city, and region:
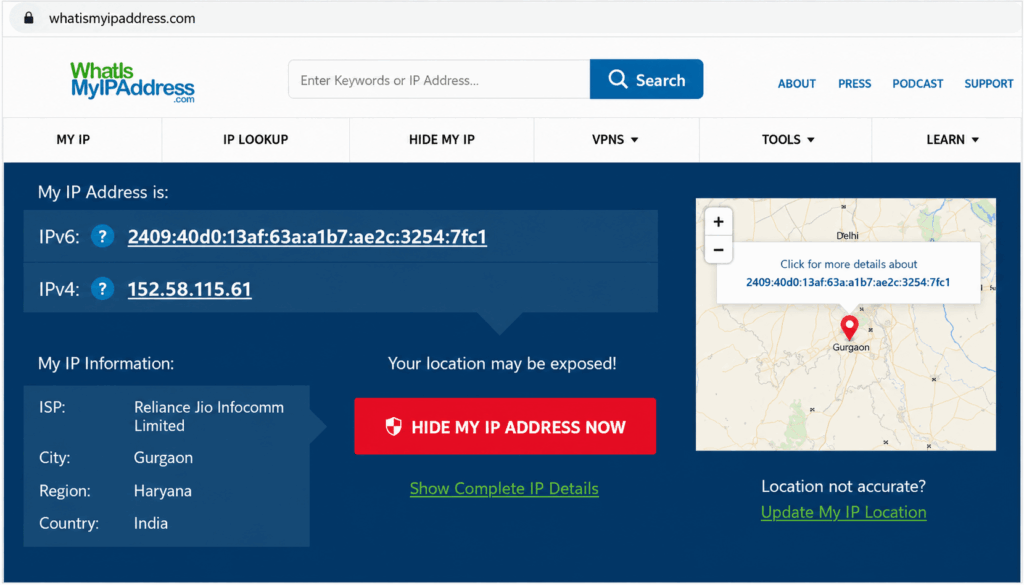
A dynamic IP lookup — this address is tied to your current ISP session and will change the next time you check it. Notice it also reveals your ISP (in this case Reliance Jio), city, and region.
💡 Quick check: If you look up your current IP address today and check again in a day or two, you’ll likely see it has changed. That’s a dynamic IP in action.
A static IP, on the other hand, is a reserved, unchanging address — like buying a permanent address just for yourself.
SEBI now requires that any order placed via API come from a static IP so that it can be traced back to a specific client and server. This is essentially a form of geo-tagging for compliance: SEBI can confirm exactly which client and which server generated a given order.
Two Ways to Get a Static IP
Broadly, there are two approaches to meeting this requirement.
Option 1: Get a Static IP From Your Home ISP
You can call your internet service provider — Airtel Xstream Fiber, Jio, ACT Fibernet, or whichever broadband provider you use — and request a static IP for your home connection.
How it works:
- Your ISP assigns a fixed IP address to your home broadband connection.
- This IP will remain constant as long as you keep paying for it.
- Typical cost: ₹300–₹350 per month.
The catch: This static IP is tied to your home broadband connection specifically — not to you as an individual. If you take your laptop and travel somewhere else, you’ll be connecting through a different network, and that static IP simply won’t be available. Your algo will stop working the moment you’re off your home network.

Option 2: Get a Static IP Through a Cloud Server (Recommended)
This is the method covered in detail in this guide. Instead of tying the static IP to your home internet, you rent a small cloud server (a “droplet,” in DigitalOcean’s terminology) and reserve a static IP for that server.
Why this is better:
- You can access your algo from anywhere in the world — even from your phone — since the algo lives on the server, not your laptop.
- The static IP itself is free; you only pay for the server it’s attached to.
- Server costs can start as low as $4/month (~₹400), scaling up depending on how much computing power your strategy needs.
The rest of this guide focuses on setting up Option 2 — a cloud-based static IP — step by step, using DigitalOcean and the Dhan broker API as a working example.
What You’ll Need
- A DigitalOcean account (or any similar cloud provider like AWS or Azure)
- A broker account with API access (this guide uses Dhan)
- Your algo trading code/files ready to deploy
- About 30–45 minutes for the full installation process
Step-by-Step Guide
Step 1: Understand What a Server Actually Is
Before diving in, it helps to demystify the word “server.” A server is simply a computer — much like the CPU tower of a desktop computer — that stays on and connected to the internet. Your algo’s code files live and run on this computer.
You don’t need to physically buy or maintain this computer. Instead, you rent one from a cloud provider such as:
- DigitalOcean
- AWS (Amazon Web Services)
- Microsoft Azure
Pricing depends entirely on the size of the server you choose — options range anywhere from roughly ₹400 to ₹40,000 per month, depending on processing power and memory.
Step 2: Create a DigitalOcean Account and Open the Dashboard
- Go to digitalocean.com and sign up for an account if you don’t already have one.
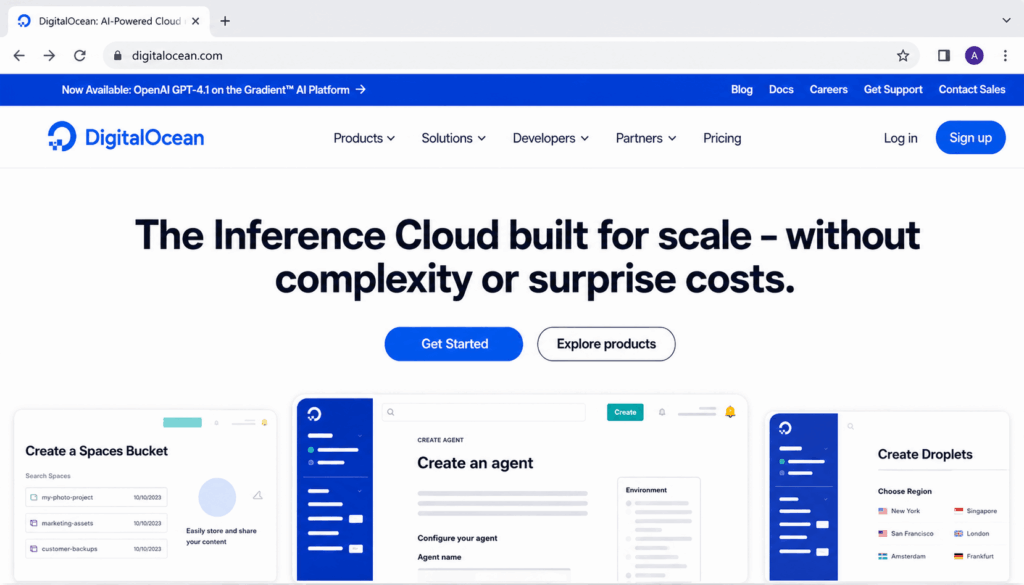
DigitalOcean’s homepage — click “Sign up” if you’re new, or “Log in” if you already have an account.
2. Once logged in, you’ll land on your project dashboard. This is your control center for creating and managing servers (“Droplets”), reserved IPs, and other cloud resources.
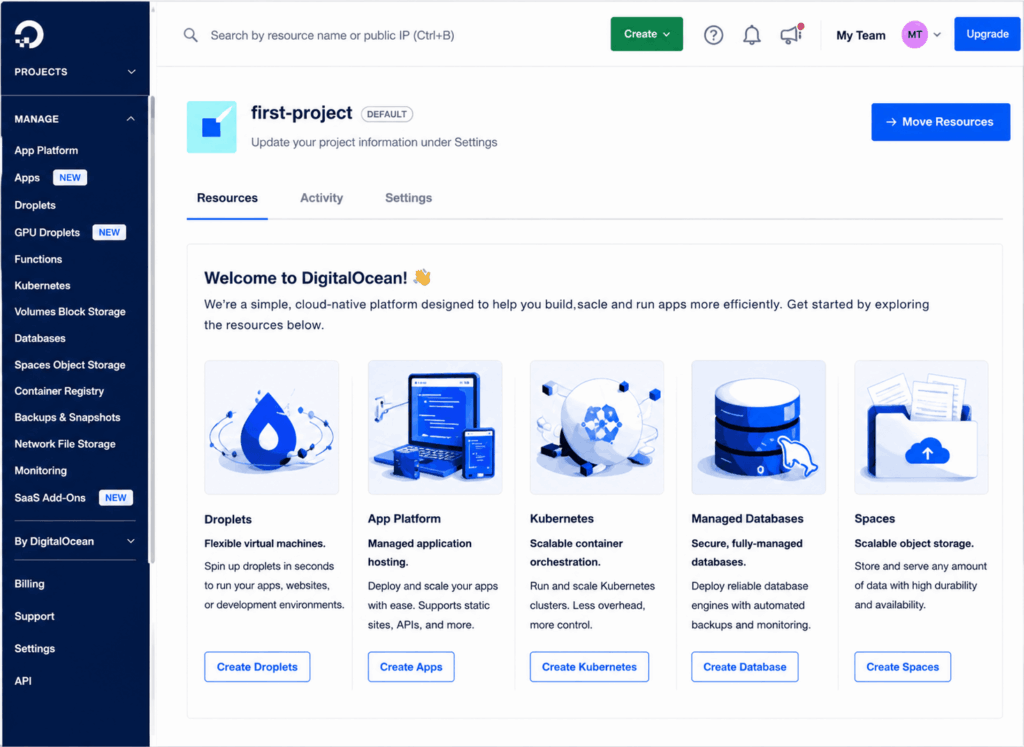
Your DigitalOcean dashboard. Notice the “Droplets” option in the left sidebar — that’s where cloud servers are created and managed. A new account starts inside a “first-project” workspace by default, which is fine to use as-is.
Step 3: Create Your Cloud Server (Droplet)
From the Droplets section, click Create Droplet.
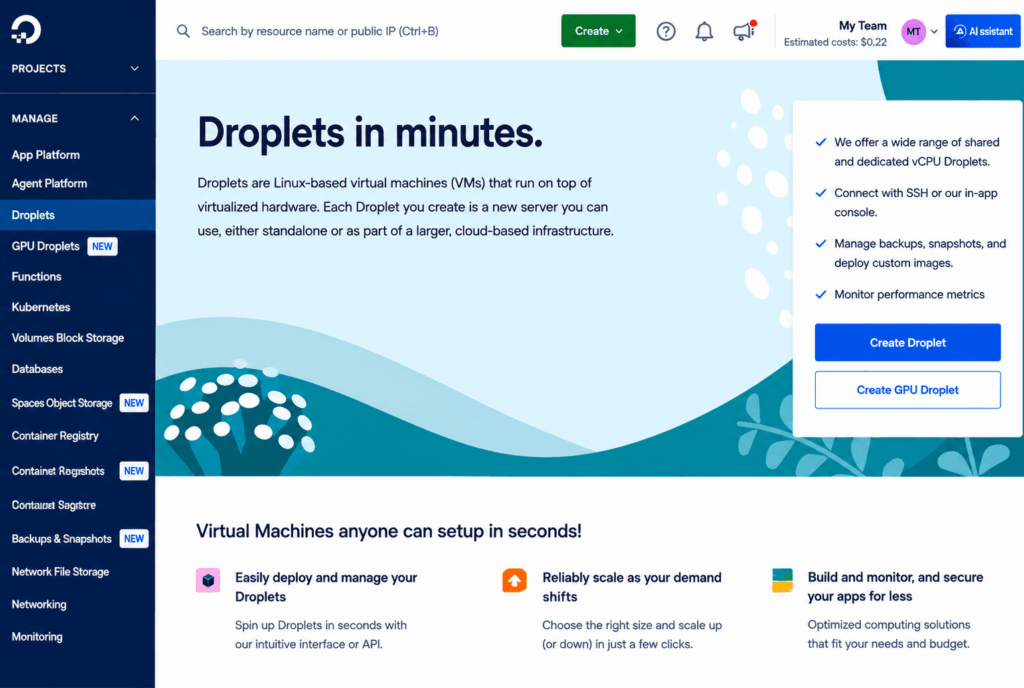
This is the main entry point for spinning up a new server. DigitalOcean provisions it as a fully working Linux virtual machine within minutes.
Choosing your region:
- Select Bangalore (BLR), since it’s the data center location closest to India’s exchanges (NSE). A closer server region generally means lower latency when placing orders.
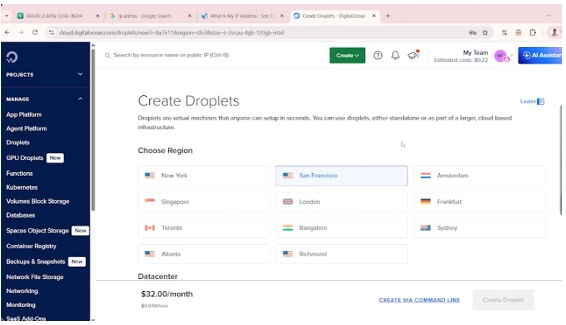
Region selection screen. Bangalore appears alongside international options like New York, London, and Singapore — pick Bangalore for the lowest latency to Indian exchanges.
Choosing your operating system and size:
- Operating System: Choose Ubuntu (the latest LTS version, e.g., 24.04). Ubuntu is a Linux-based operating system, and unlike Windows, it doesn’t carry any licensing fees — which is exactly why Ubuntu-based servers are noticeably cheaper than Windows-based ones.
- Droplet Type: Keep it on Shared CPU → Basic, which is more than sufficient for running an algo trading script.
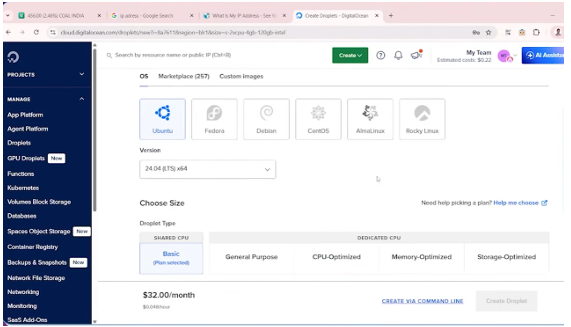
Select Ubuntu from the OS row, and leave the droplet type set to “Basic” under Shared CPU — no need for the more expensive dedicated-CPU tiers for a typical algo setup.
Choosing your server size (CPU/RAM):
- If you’re just starting out and testing your algo, the $4/month plan (512 MB RAM, 1 vCPU) is enough to get going, though it runs a bit slower.
- If your algo is already built and actively running live, opt for at least the $12/month plan (2 GB RAM) for smoother performance.
- Larger, more resource-intensive strategies can scale up further — the example in this walkthrough uses the $48/month plan (8 GB RAM, 4 CPUs, 160 GB SSD) to keep everything fast for demonstration purposes.
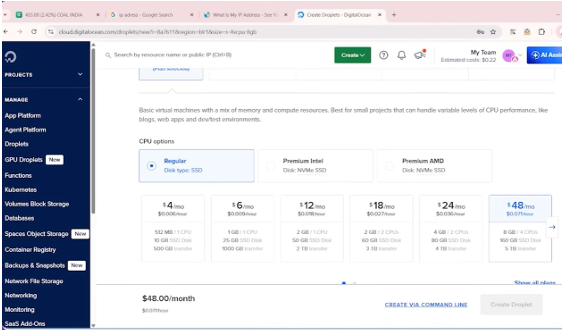
Pricing tiers scale from $4/month (512 MB RAM) up to $48/month (8 GB RAM, 4 CPUs) and beyond. Pick a size based on your strategy’s actual resource needs — you can always resize later.
⚠️ Note on billing: DigitalOcean doesn’t charge the full monthly amount the moment you create the droplet. You’re billed per hour of usage. So if you only run the server for one hour, you’re only charged for that one hour — not the whole month. You can turn the server on and off based on your needs.
Under Authentication Method, choose Password, then set a root password for your server. Make sure it meets the platform’s requirements (at least 10 characters, one uppercase letter, one number, and it can’t end in a number or special character). Keep this password safe — you’ll need it to log in later, and DigitalOcean will not email it to you.
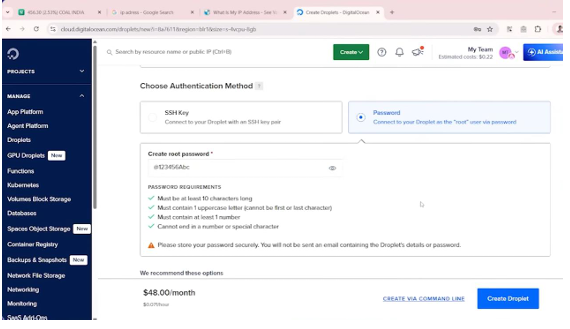
Choose “Password” (simpler for beginners than SSH keys) and set a strong root password. Store it somewhere safe immediately — it’s shown only once.
Click Create Droplet. DigitalOcean will now provision your server and install the base operating system.
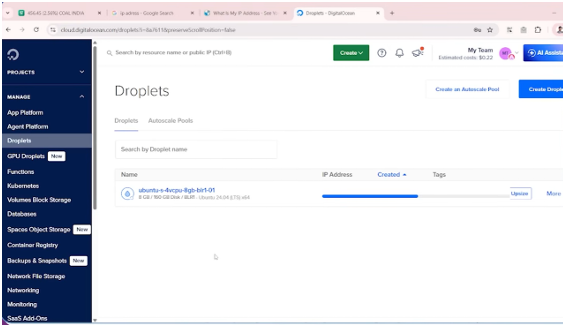
While your droplet is being provisioned, you’ll see a progress indicator next to its name in the Droplets list. This usually takes less than a minute.
Once ready, your droplet will appear as fully active in your Droplets list, complete with its assigned public IP address.
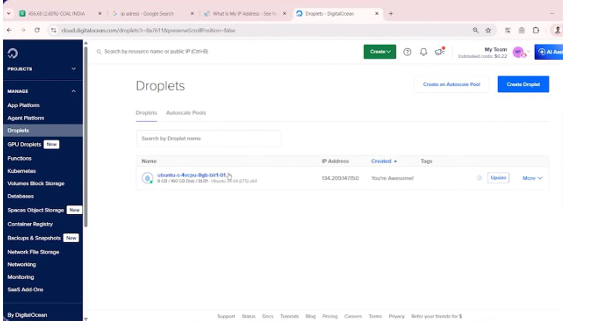
Your new server (“ubuntu-s-4vcpu-8gb-blr1-01” in this example) is now live, with an assigned IPv4 address. This confirms the server itself is ready — the next step is to reserve a static IP for it.
Step 4: Reserve a Static IP for Your Droplet
Click into your newly created droplet to open its detail page. Here you’ll see key server details — its IPv4 address, private IP, and an option labeled “Reserved IP” (DigitalOcean’s name for a static IP), which starts off unassigned.
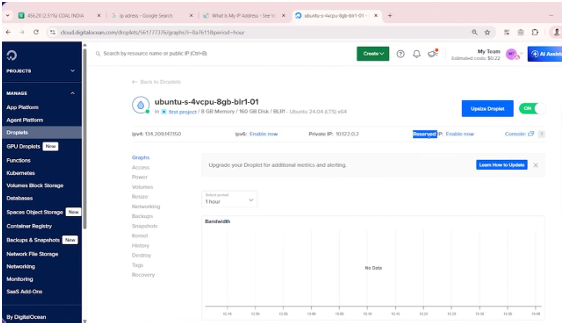
Your droplet’s overview page. Notice “Reserved IP: Enable now” next to the private IP — this is where you’ll attach your permanent static IP address.
- Click Enable now (or navigate to Networking → Reserved IPs) to add a reserved IP.
- In the dialog that appears, choose: –IP Type: IPv4 Address
–Where to add the IP: Assign to Droplet
–Select a Droplet: your newly created server (it should already be selected by default) - Click Add a Reserved IP to this Droplet.
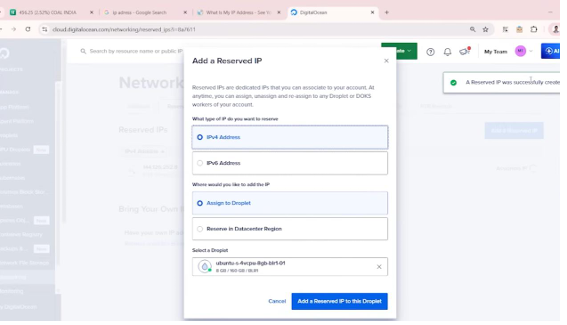
This dialog is where the static IP actually gets created and permanently linked to your server.
Since it’s attached to a droplet you’re already paying for, there’s no extra charge for the
reserved IP itself.
Once confirmed, your droplet’s detail page will now display the reserved IP address
permanently alongside its regular IPv4 address.
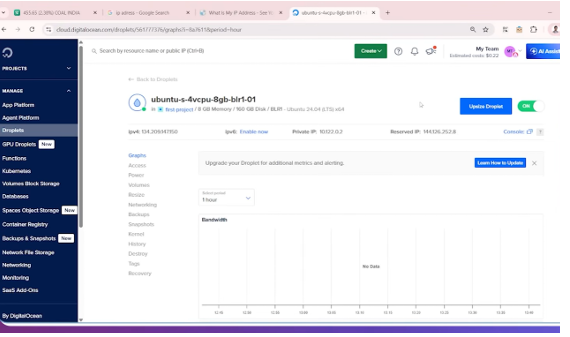
The Reserved IP field now shows a permanent address (144.126.252.8 in this example). This IP will never change as long as it stays attached to your account — even if you resize or rebuild
the underlying droplet.
Step 5: Register Your Static IP With Your Broker’s API
Now that you have a static IP, you need to tell your broker (Dhan, in this example) which IP address your orders will be coming from.
- Log in to your broker platform and navigate to Trading APIs → Generate Access Token / API Key.
- Scroll down to the Optional Settings → Static IP Setting section.
- Enter your reserved IP address from DigitalOcean (you can typically add up to two IP addresses).
- Save your changes.
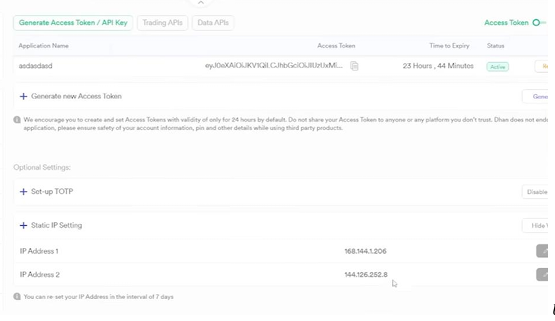
Under “Static IP Setting,” add the reserved IP from your droplet. Dhan allows up to two registered static IPs, and — as noted on the page — you can reset a registered IP once every 7 days, so double-check the address before saving.
⚠️ This step is mandatory. Whichever machine — laptop or server — you use to fire orders through the API must have its static IP registered with your broker. If it isn’t registered, your orders won’t be accepted.
Step 6: Connect to Your Server
With the server and static IP both ready, it’s time to log in and start installing your algo’s environment.
- Go back to your Droplets list, and next to your server, click More → Access console.
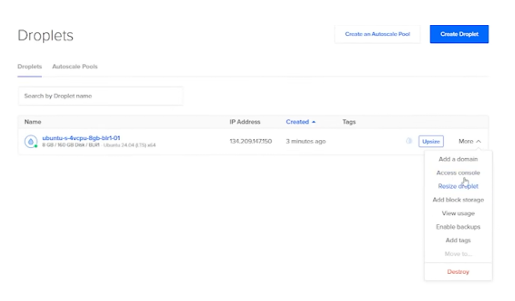
From the Droplets list, use the “More” menu to jump straight to the console access option instead of navigating through each tab individually.
2. On the Access tab, confirm the login is set to root, then click Launch Droplet Console.
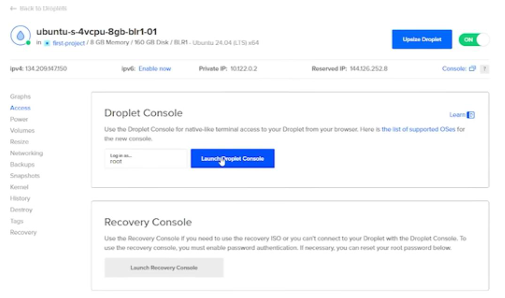
The Droplet Console gives you native, browser-based terminal access to your server — no separate SSH client needed. Click “Launch Droplet Console” to open it.
3. Once the console opens, log in using:
–Username: root
–Password: the password you set when creating the droplet
You’re now inside your server, ready to install everything your algo needs to run.
Step 7: Run the Installation Commands
With the installation script (shared as a setup file alongside the original tutorial), you’ll run a series of commands in order. In total, there are around 10 installation steps, broadly covering:
- System update — updates the server’s package list and existing software (this step takes the longest, often several minutes).
- System upgrade — installs available updates.
- Dependency installation — installs the base packages your Python environment will need.
- System reboot — restarts the server to apply changes cleanly.
💡 Tip: Simply copy each command from the installation script, paste it into the terminal, and press Enter. Repeat in sequence — no need to type anything manually except your login password.
After the reboot, wait about a minute for the server to fully restart before continuing.
Step 8: Set Up Your Project Folder and Upload Your Algo Files
- Reconnect to your server via Remote Desktop or the console.
- Create a new folder — for example, “Installation” — to hold your project.
- Inside it, create a subfolder for your specific strategy (for example, “Breakout Algo”).
- Copy your algo’s code files (the ones you prepared beforehand) from your local machine and paste them into this folder on the server.
Step 9: Complete the Remaining Installation Steps
- Right-click inside your project folder and select Open Terminal Here.
- Run the remaining setup commands in sequence. These typically include:–Creating a virtual environment for your Python project
–Installing required Python libraries — including packages for numerical computation, data handling (pandas-style libraries), datetime handling, Excel automation, and technical analysis indicators (TA-Lib) - Run the final installation script (often named something like install.sh).
Once the final script completes, you’ll see a confirmation that installation is finished.
Step 10: Test Your Setup With a Sample Order
Now for the moment of truth — confirming that your server can actually place orders through the broker’s API using your new static IP.
- In the terminal, navigate to your algo folder.
- Run your order-testing script, for example:
python3 order_testing.py
3. The script will authenticate with your broker account, fetch the latest instrument file, and attempt to place a test order.
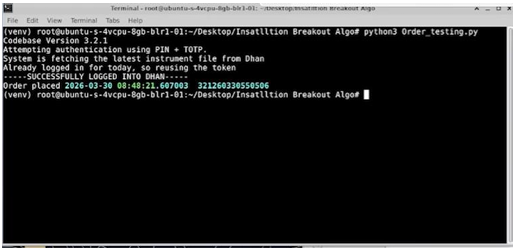
A successful run looks like this: the script logs in using PIN + TOTP, confirms “SUCCESSFULLY LOGGED INTO DHAN,” and prints the placed order’s timestamp and order ID (321260330550506 here).
4. Switch over to your broker’s app or dashboard and check your order book / order history to confirm the order appears with a valid order ID.
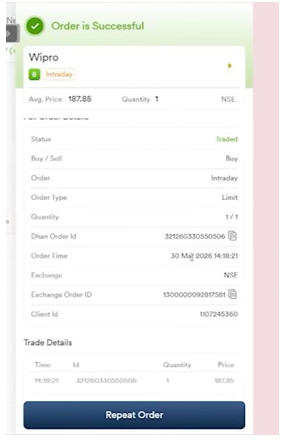
The order shows up on the broker side too — status “Traded,” order type “Limit,” and the
same Dhan Order ID (321260330550506) that appeared in the terminal. This match confirms
your static IP setup is correctly authorized end-to-end.
If you see your test order reflected on the broker’s platform with a matching order ID,congratulations — your static IP setup is working correctly, and your algo is now SEBI
compliant.
Understanding Order Speed and Rate Limits
It’s worth knowing how fast your orders can actually be placed through the API.
- Dhan’s API can handle roughly 10 requests per second.
- In testing, firing multiple orders in quick succession showed orders landing at a rate of close to 10 orders per second — roughly one order every 100 milliseconds.
⚠️ Important: This is purely to illustrate API speed. In practice, there’s rarely a reason to intentionally fire 10 orders simultaneously — it’s simply useful to understand the platform’s throughput limits.
Additional SEBI Update: No More Market Orders via API
Alongside the static IP requirement, there’s another important regulatory change to be aware of:
- Market orders can no longer be placed via the API.
- Only limit orders are permitted through algo trading APIs going forward.
Workaround for market-order-like behavior: If you want a limit order to behave like a market order, set your limit price aggressively: – For a buy order, set your limit price higher than the current market price (LTP). – This effectively guarantees the order fills like a market order would, while technically remaining a limit order.
Managing Your Server Long-Term
Your cloud server will keep running — and billing you — for as long as it’s active, regardless of whether your strategy is currently trading. You have two options when you want to pause or stop:

If market conditions change dramatically — for example, high volatility (India VIX spiking) or any other reason you want to halt trading — you can either pause your strategy or fully tear down the server.
To destroy a droplet:
- Go to your droplet’s page and select Destroy from the left-hand menu, then click Destroy this Droplet.
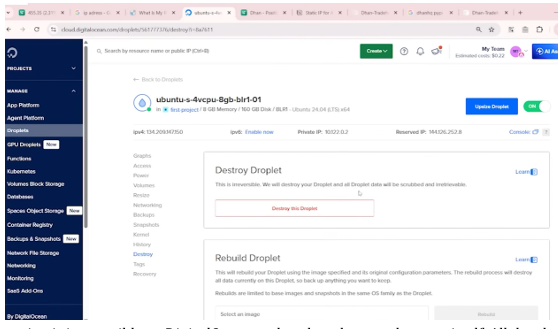
This action is irreversible — DigitalOcean makes that clear on the page itself. All droplet data will be scrubbed and cannot be recovered, so make sure you’ve backed up anything important first.
2. A confirmation dialog will appear, warning that any associated resources — like your reserved IP — won’t be deleted automatically unless you select them. Check the box to also delete the reserved IP, then type the confirmation text and your droplet’s exact name to proceed.
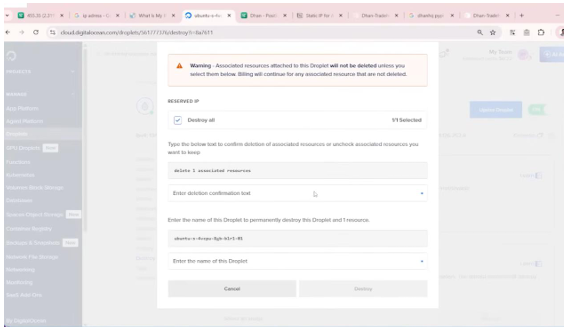
This double-confirmation step (typing “delete 1 associated resources” plus your droplet’s exact
name) prevents accidental deletion. Once confirmed, both the server and its static IP are
permanently removed, and billing for both stops immediately.
Resources
For the complete walkthrough and the full source code used in this optimisation, refer to the links below:
- YouTube Video: https://youtu.be/EINZqpcn9Cw?si=lrSHax5sQnjRu3y2
- Code Drive: https://drive.google.com/file/d/1h02AS3JpJDP1XeNyQFwvQPLoDnyw6iCv/view
- Installation Steps: https://slender-lamb-507.notion.site/Static-IP-for-Algo-Trading-Full-Setup-3316d6cfd2cb80e58033ee4088007ab2
Questions about the code or the underlying logic can be posted in the “Learn Algo Trading” section on Meet for Trade, where they will be reviewed and answered.
Summary
Here’s the complete workflow in brief:
- Understand the requirement: SEBI mandates a static IP for any API-based order placement in algo trading.
- Choose your approach: A home-ISP static IP works but ties your algo to one location; a cloud-based static IP is free, flexible, and accessible from anywhere.
- Create a cloud server (e.g., a DigitalOcean droplet running Ubuntu, based in Bangalore for proximity to NSE).
- Reserve a static IP and attach it to your droplet at no extra cost.
- .Register that static IP with your broker’s API settings.
- Install your algo’s environment on the server — system updates, Python virtual environment, and required libraries.
- Upload your algo files and run a test order to confirm everything works end-to-end.
- Stay aware of related SEBI rules, such as the ban on market orders via API — only limit orders are allowed.
- Manage costs by pausing or destroying your server whenever your strategy isn’t in use.
With this setup, your algorithmic trading strategy will be fully compliant with SEBI’s static IP requirement, while remaining accessible from anywhere in the world — not just your home network.