
LIVE on Dhan Cloud | Zero Coding Algo Trading
Today’s post covers a special milestone in this series: taking your algorithm from a script on your laptop to a live trading bot placing real orders on the exchange. Everything up to this point — reading candles, calculating RSI and EMA, scanning for momentum — has been preparation. This is the part where it all comes together.
By the end of this article, you will know how to:
- Add real order-placement logic to your momentum strategy using Dhan’s Super Order.
- Prevent your algo from firing the same order again and again — a mistake that can silently wipe out an account.
- Understand why SEBI’s static IP requirement means your algo usually can’t trade from your own laptop.
- Deploy your strategy on Dhan Cloud, secure your credentials properly, and schedule it to run automatically every trading day.

1. From Signal to Order: What "Order Placement" Actually Means
But a signal by itself doesn’t make you money. Somebody — or something — still has to actually click “Buy.” That’s what order placement logic does: it takes a validated signal and converts it into a real, executable order sent to your broker.
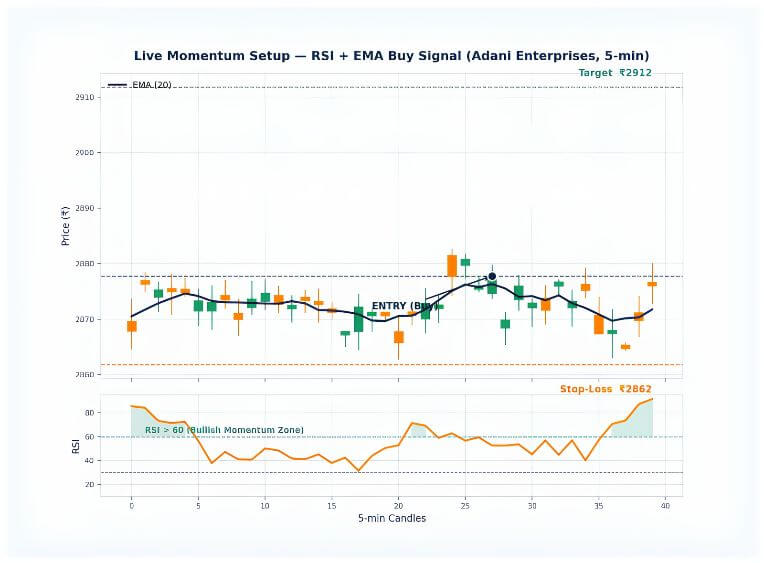
Figure 1: Once RSI and EMA both confirm bullish momentum, the algo calculates an entry, target, and stop-loss directly from the last closed candle.
For every order, your algo needs four pieces of information, and all four come from the same place — the most recently closed candle:
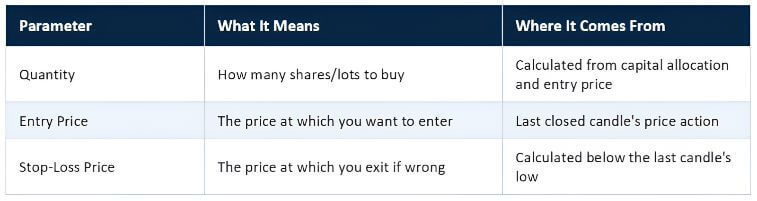


2. Placing the Order: Dhan's Super Order
Instead of placing a plain buy order and then separately tracking the stop-loss and target, this strategy uses Dhan’s Super Order feature. A Super Order lets you submit the entry, target, and stop-loss — along with an optional trailing stop-loss — as a single order object.
Here’s the shape of the order the algo sends:

At this stage, the strategy only implements the buy side. Writing the mirrored sell-side logic (short-selling when momentum turns bearish) is left as practice — the pattern is identical, just with the transaction type and conditions flipped.
3. The Danger of Running Inside a Loop: Duplicate Orders
Here’s a problem that isn’t obvious until you actually go live: your scanning logic runs inside a loop that re-checks every stock every few seconds. That’s exactly what you want for scanning. It is exactly what you don’t want for order placement.
Think about it — if RSI, EMA, and the gap condition are all true for a stock right now, they’ll probably still be true 5 seconds from now, and 5 seconds after that. Without a safeguard, your algo will fire a fresh buy order on every single loop cycle, for the same stock, for as long as the condition stays true.
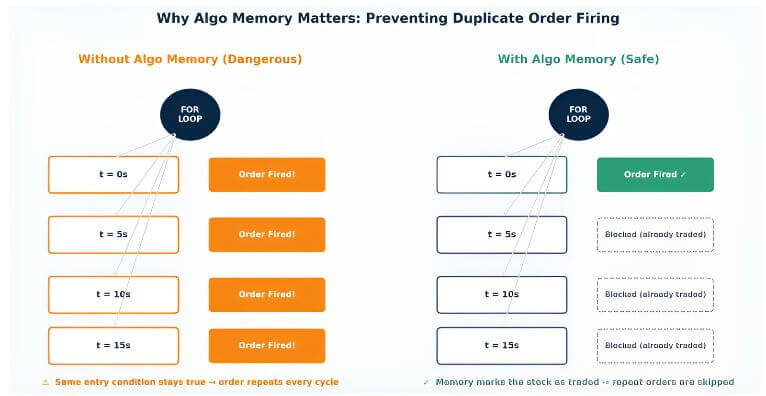
Figure 2: Left — without a safeguard, the same true condition fires a new order on every loop cycle. Right — a memory check blocks repeat orders for a stock that has already been traded.

The Fix: Algo Memory
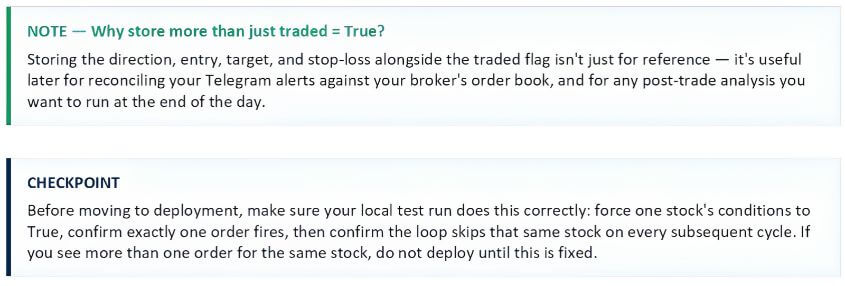
The solution is simple — maintain a memory (a dictionary in Python) that tracks whether each stock has already been traded in the current session.
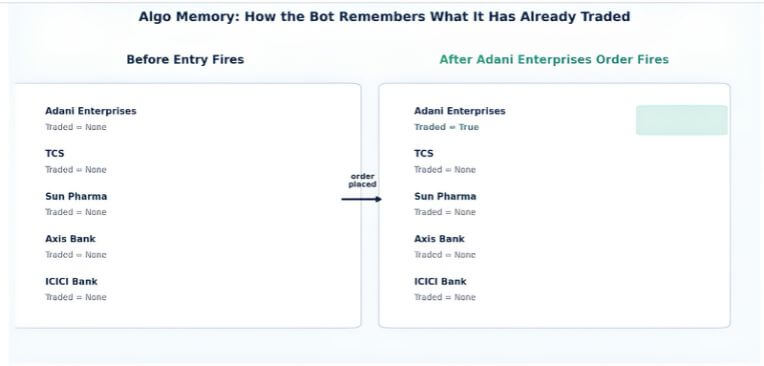
Figure 3: Before any order fires, every stock’s memory is empty (None). The moment an order is placed for a stock, its memory is updated — so the next loop cycle skips it.
4. Why You Can't Deploy an Algo From Your Laptop
Once the order placement and memory logic are working locally, the natural next step is to just run the script and leave it on. Except this is exactly where most beginners hit a wall: SEBI’s algo trading framework requires a static IP address for any system placing algorithmic orders, effective from April 1st. A personal laptop connects through a home or mobile network, which almost always assigns a dynamic IP — one that changes periodically. That disqualifies it from live order placement under this rule.
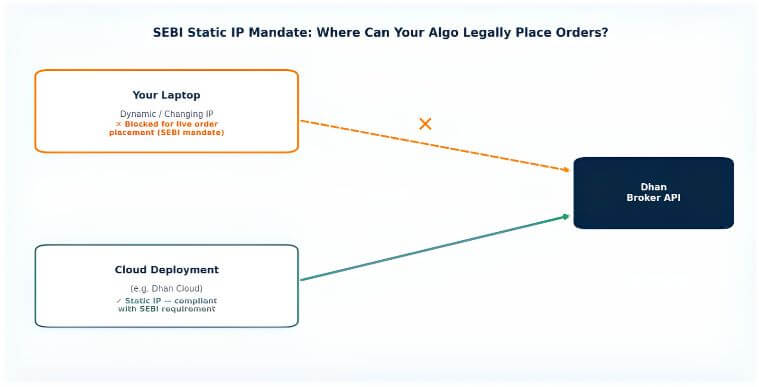
Figure 4: A laptop’s dynamic IP cannot be used for compliant algo order placement. A cloud deployment with a static IP can.

This is exactly the problem that a managed platform like Dhan Cloud solves — it gives your strategy a static IP by hosting the execution environment for you, so you don’t have to provision or maintain a server yourself.
5. Deploying Your Strategy on Dhan Cloud
With the code finalized, deployment itself is a short, repeatable process.
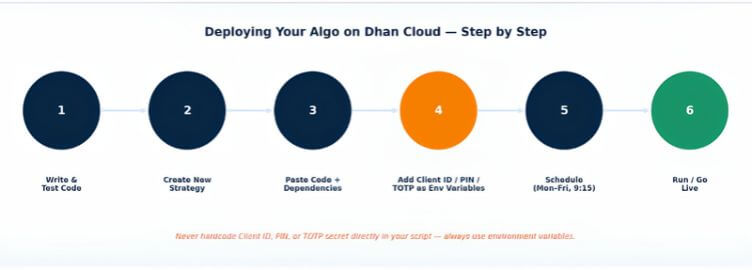
Figure 5: The six-step path from a tested local script to a live, scheduled algo running in the cloud.
Step-by-Step
- Log in to Dhan Cloud using the same phone number linked to your Dhan trading account.
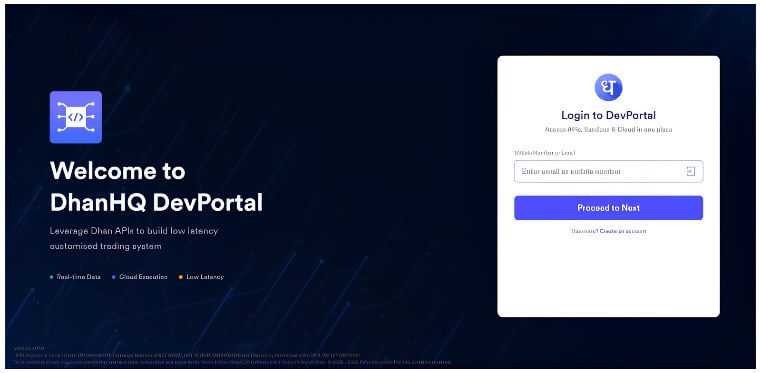
Screenshot: Logging in to the Dhan Cloud / DevPortal using your registered mobile number or email.
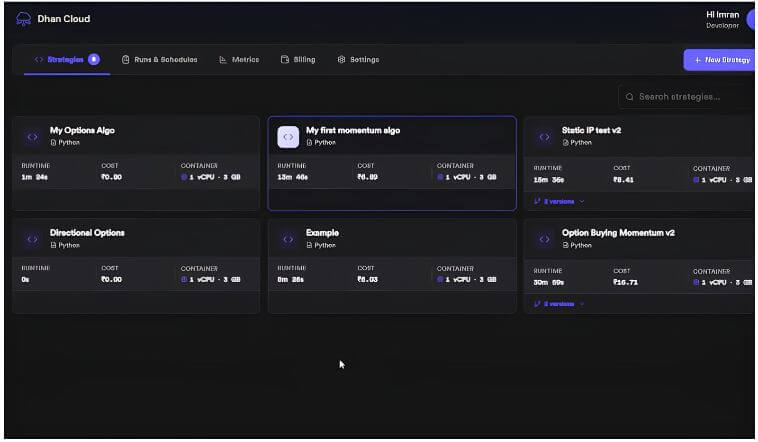
Screenshot: The Strategies dashboard after logging in, showing existing deployed strategies.
2. Create a new strategy and choose a blank Python strategy as the starting point.
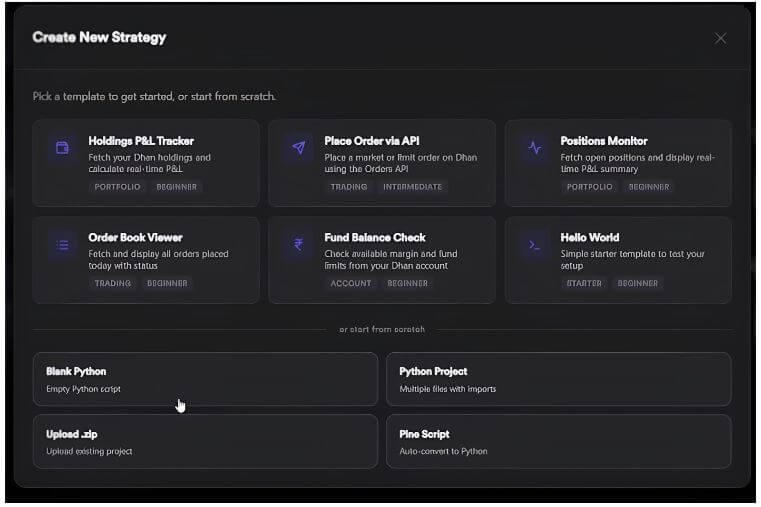
Screenshot: The Create New Strategy panel — pick a ready-made template or start from scratch with Blank Python.
3. Paste your complete, tested code into the script editor, and copy over any external package dependencies your script needs into the dependencies section.
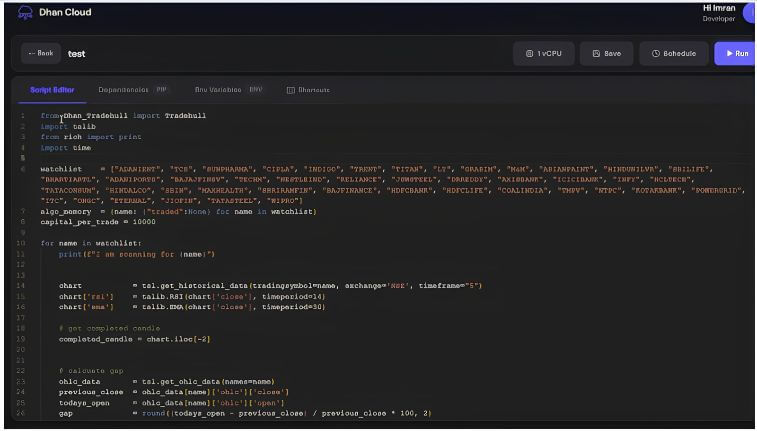
Screenshot: The Script Editor with the momentum strategy code pasted in, watchlist and all.
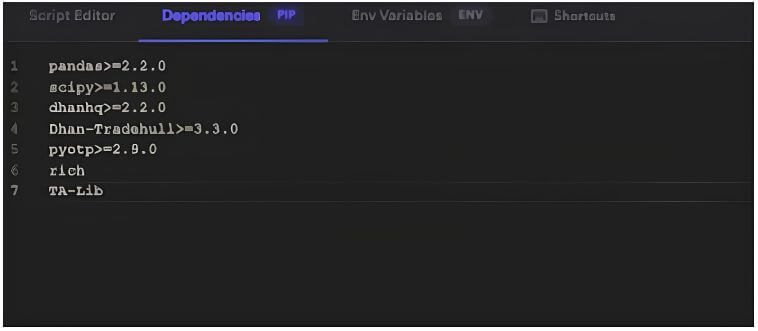
Screenshot: The Dependencies tab listing required packages — pandas, dhanhq, Dhan-Tradehull, pyotp, and TA-Lib.
5. Configure your credentials as environment variables — this is the one meaningful code change required for deployment.
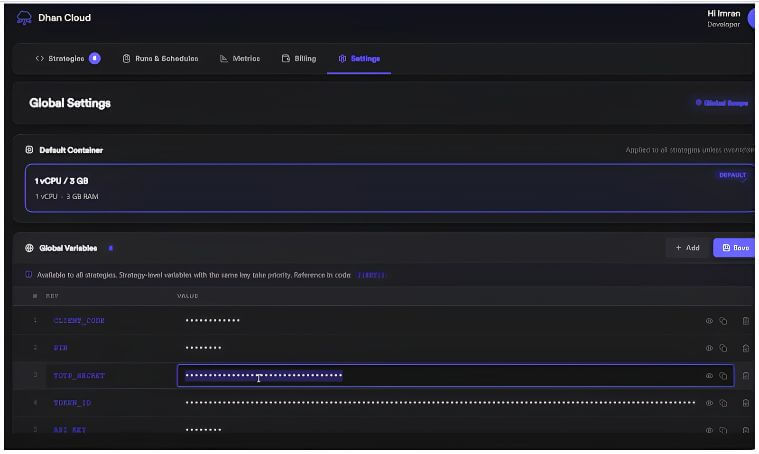
Screenshot: Global Settings — Client Code, PIN, TOTP Secret and other credentials stored securely as environment variables.
5. Set up a recurring schedule so the strategy runs automatically every trading day.
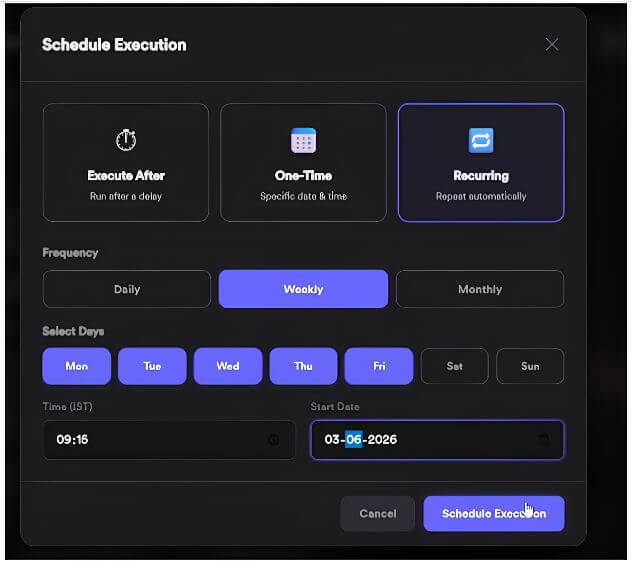
Screenshot: Scheduling the strategy to run automatically every weekday (Mon–Fri) at 9:15 AM IST.
6. Run once manually to confirm everything executes correctly, then let the schedule take over from the next session.
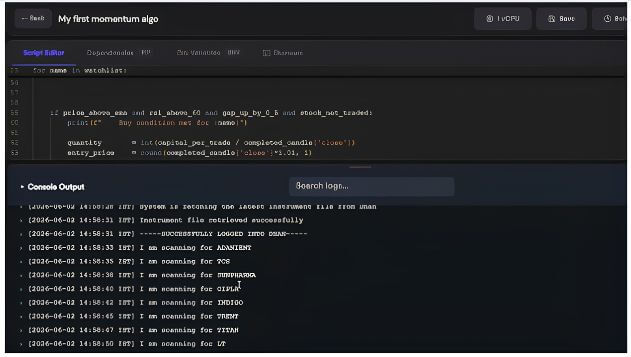
Screenshot: Console output from a manual run — the algo logs in successfully and scans each stock in the watchlist.
Securing Your Client ID, PIN, and TOTP Secret
WARNING – Never hardcode credentials in your script
Dhan Cloud explicitly disallows placing your Client ID, PIN, and TOTP secret directly as plain strings inside your Python code. Instead, these must be set as environment variables through the platform’s settings page.
The workflow is:
- Go to Dhan Cloud → Settings.
- Enter your Client Code, PIN, and TOTP secret in the designated fields.
- Save. These values are now securely available to your script at runtime, without ever appearing as plain text in your code.
In code, this simply means reading them from the environment instead of typing them in directly:
This is the only functional difference between your local test version and the cloud-deployed version of the script — everything else (the strategy logic, order placement, and memory handling) stays identical.
Scheduling Automatic Execution
Once credentials are configured, set the strategy to run automatically:
- Frequency: Recurring, Weekly
- Days: Monday through Friday
- Start Time: 9:15 AM (market open)
From the next trading session onward, the algo starts itself — no manual intervention required.
TIP — Always do a manual test run first
Before trusting the schedule completely, hit the manual “Run” button once and watch the logs closely. Confirm the scanner picks up your watchlist, indicators calculate correctly, and — most importantly — that no duplicate orders fire. It’s much easier to catch a bug during a manual run than during an unattended scheduled one.
6. Going Live: Watching the Algo Work
Once deployed and running, the algo continuously scans the watchlist — checking RSI, EMA, and gap conditions on each stock — and places a Super Order the moment any stock qualifies.
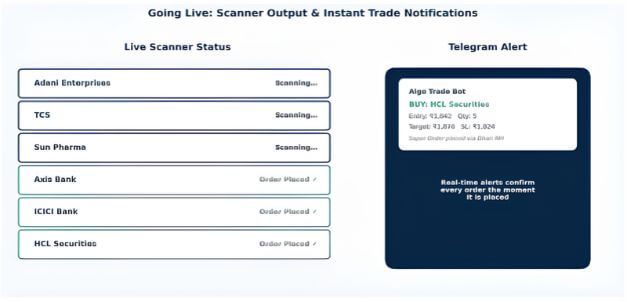
Figure 6: The scanner works through the watchlist in real time. The instant a qualifying stock is found, a Super Order is placed and a Telegram alert confirms the trade details.
A Telegram notification for every order placed gives you a live audit trail without needing to keep the Dhan Cloud dashboard open all day — useful for confirming trades from your phone, especially during market hours when you may be away from your desk.
NOTE — This is a beginner deployment, not a finished production system
This walkthrough demonstrates the mechanics of deployment. Before running any strategy with real capital at scale, layer in additional safeguards: position sizing limits, a maximum daily loss cutoff, and monitoring/alerting for when the algo itself stops running unexpectedly.
Summary
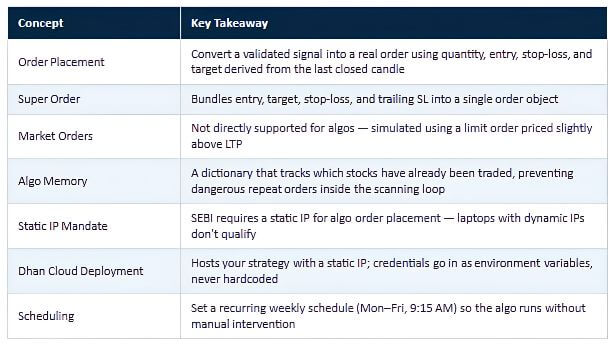
This is your first fully deployed, live algo — scanning the market and placing real orders on its own, safely, and in compliance with SEBI’s static IP requirement. The next step in this series combines this same buy-side logic with options, so you can see how order management changes when trading option contracts instead of equity.
Resources
YouTube Video: Deploy Your First Trading Bot 🤯 LIVE on Dhan Cloud | Zero Coding Algo Trading
Code Files (Google Drive): Download the complete strategy code
Investments in the securities market are subject to market risk. Read all the related documents carefully before investing.